3.31.2008

3/31 Monday Challenge

I have a name for mundane, repetitive, never-ending things at my house like laundry, or meal preparation, or exercise ( Rolling Eyes ). I call them Gerbil Jobs. You know how you have a gerbil and his cage and to give him some exercise you get one of those wheel things and the gerbil thinks its the best thing EVER. He jumps on there and runs and runs and runs and runs and runs. And he never gets anywhere. Just like those jobs.....you can do all the laundry in the house and you turn around and it's there again....like it grew overnight.

Stay with me...I'm going to connect this...sort of. Spring is starting to make an appearance in various areas of the country which brings to mind things like spring cleaning and spring holidays like Easter where you do things like dye eggs, and hunt them. Where I'm going with this.....there are certain things you do every year.....without fail. They're kind of like extended Gerbil Jobs in a way because you turn around and it's time to do them again.

So this week, I want you to create a layout about an extended Gerbil Job...something you do every year without fail. Do you spring clean? Document it. Do you make New Year's Resolutions and write them down? Do you do something to mark the changing of any season? Do you have an annual school shopping excursion in the late summer? Do you have to take a drive to see the changing leaf colors? Do you look forward to the first day of summer fishing? Do you eat Popsicles or ice cream every day in the summer? Do you make homemade ice cream for the 4th of July? Do you take a trip to the same place every year? Gather several photos from across the years and make a layout about what you love about it. I don't know about you, but No Boy Thursday may be making a regular appearance at our house.


We had several takers for last week's old/new challenge....thanks! There have been some really great layouts using old and new product. See what you can do with this week's!
~Catherine

3.29.2008

30 Minutes or LESS!

I usually don't like spending hours and hours on one layout. Scrapping is fun for me and I want to keep it that way, so I don't like agonizing over one page. So, I thought I'd give you instructions on scrapping quickly. This page was done in under 30 minutes, except that I already had my photo chosen and printed.

{I always place everything down until I like the way it looks, then go back and ink everything and then start glueing in place.}

First I chose my photo and printed it, then matted it. Then I chose my pp's. Limit yourself to 10 minutes for this process or you could spend alot of your time trying to chooose the 'perfect' pp's! Then, I chose some already cut papers and a piece of cardstock for the background. Laid the pp pieces on my cs along with the photo until I liked what I saw. Tore the vertical strip down one side. Then, chose 1 deco strip. Here I chose a Doodlebug paper frill and placed it along the side. Next, I placed the butterfly and cut out different colored pieces for the accent colors. Chose some black brads to go down the center of the butterly. Next, chose 3 button accents to match. I used Love, Elsie Chipboard Buttons along with tiny brads. Then, I found a title sticker, which described the photo and lastly, chose a journal tag and quickly jotted down my thoughts. Wa La! DONE!

Supplies Needed for 12 x 12 layout -
1 photo (4 1/2" high x 5 1/2" wide)
1 CS for background, 1 photo matte
3 pieces Patterned Paper (8 1/2" Wide x 9" high), (8 1/2" wide x 3/4" high), (3" wide x 11 1/4" high)
1 deco trim.........ribbon, paper frill, deco strip
1 main accent......butterfly, flower, star, etc.
3 smaller accents......buttons, brads, flowers, etc.
1 title
1 journal tag

I hope you'll try scrapping quickly and see what you come up with. Since I have ALOT of photos to scrap for my grandkids I think I'm gonna use this same technique and design for the other kids' pages as well. Possibly turning the design around. Would be a pretty quick way to get 5 layouts done!

3.28.2008

Precious Photos


I have been spending some time going through and organizing photos. It seems that for me this is a bit of a never ending process. I am pretty good at keeping up with current photos but because of scrapbooking I have become “the keeper of photos” for my family. And I am actually very happy about that! I mean imagine my luck to have the photos from my maternal grandparents honeymoon to Mt. Rushmore. And when looking at the photos seeing Mt. Rushmore under construction – wow – that is history!! A little less remarkable in terms of American history but just as important in my personal history is a picture of my paternal grandfather home on leave from World War II holding my dad as an infant for the first time. And a picture of my dad and mom on their wedding day. I am not sure how or when I am going to scrapbook all of these treasures but I do know that I am so pleased to be the unofficial keeper of the photos in my family.

Lynne


3.23.2008

Because I couldn't make up my mind...

I have TWO ad challenges for you on
this beautiful spring day. :)


In the first ad, I was inspired by
the long vertical strips.
Aren't they cool?


For my take on this ad I used
Scrapaddict's beautiful March
kit called Damask Me No Questions.
I also incorporated Catherine's
challenge from last Monday - to
scrap why you are lucky.

Did you do it yet? *wink*


And speaking of Catherine's "Monday Challenges",
I feel honored to be posting her challenge for today.
Last week somebody asked a question in the forums
about what was the oldest scrapbooking product you
owned. As soon as I saw that I knew it was coming!

So today's "Catherine" challenge is to use your oldest
supply with one of your newest. I used the second ad
challenge for this layout.

Check out the FIBER I used in my "flower girl" layout.
Remember that stuff? Gosh, I had to have it in every
color. (of course I am still that way)


I paired it with my new and very cute Love, Elsie papers that I got this past weekend.

Be sure to post your creations in our gallery and
Have a great week!
Linda

3.22.2008

I have a new toy!

I have a new toy. With this toy I can play late at night without waking my dh sleeping in the next room. There will be no need to go to the kitchen to pound on a solid surface. The best thing about my new toy is that my poor old arthritic hands don't hurt when I use it. In fact I can use my new toy time and again with no adverse affects to my hands.

What might you ask is this wonder? This miraculous invention? My Crop-O-Dile! I realize its not a new thing and many of you probably already have it. But I just couldn't see how this doo-hickey could be "all that" and more. I mean, a hole punch is a hole punch, right? Wrong!

I've looked at the Crop-o-dile before but until recently I'd never been able to try it...I like "try before you buy." I was at a lss here in Indy to get some cardstock to finish a project. They had the Crop-o-dile and the new Big Bite out where you could try them. Both of these things "ate" through multiple pieces of heavy cardstock easily...and my hands didn't hurt. To use a regular hole punch even on 2 sheets of paper I have to use both hands and then it really does hurt. I tried 4 pieces of chipboard...punched easily.

While the Big Bite was appealing to punch holes anywhere on a layout I decided to buy the Crop-o-dile. Not only because of the price difference but because I rarely need to put a hole anywhere but on edges and if I do need to I can resort to my MM hole punch, hammer and trusty CM matt.

See these holes?


Punched quickly with one hand through 1/4" thick chipboard....now this is all I can show you of my current project because it's Laura/Scrapsnsmile's gift for guessing when I"d hit 14,000 posts...and I don't want her to know what's coming.

This is a quick slick fun new toy!

3.21.2008

Adding that "extra something" to your pages

My kids have always loved my scrapbooks. They love to look through and see photos of themselves as babies or playing in a swimming pool or riding their bike for the first time, however they're getting older and becoming a little less interested in seeing my creations. But I've found a new way to get them hooked - the hidden Mickey's.

It all started in 2006 when we went to Disneyland for the first time as a family. My kids loved searching for the hidden Mickey's in Disneyland park so when I returned home I decided to incorporate that into my Disney pages. Each and every page in my Disneyland album has a Mickey head of some sort on it. Some are quite obvious.
Some are a little less so (hint: look carefully in the rocks behind us).

These were an absolute hit with the kids and 2 years later they are still regularly looking at the Disneyland albums to search for the hidden Mickey's.

Fast forward to 2008. We took a family vacation to Disneyworld this year and, as can be expect, came home with TONS of photos to scrap. The kids are all 2 years older and much wiser to my hidden Mickey ways so I knew I was going to have to be a little more stealthy this time. And I found just the thing to help me with that ... a teeny tiny Mickey head punch. AHA! Secret weapon to the rescue!!!

My first few pages have delighted the kids and they eagerly await my next completed Disney page. I'm thrilled that taking the time to add that "extra something" has been such fun for my kids. I hope in years to come they will look back on these albums regularly, even if it is just to search for hidden Mickey's.
So think about adding that little "extra something" to your scrapbook pages. Maybe pick up some sand while at the beach and use it as an embellishment on your beach photos. Or hide a heart on each page of your next mini album. There are so many little extras to choose from. Have fun with it! I can't wait to see what you come up with. :)
Annette (pixleyyy)
Scrapaddict DT

3.17.2008

Lucky, Lucky YOU!


Morning, Everyone, and Happy St. Patrick's day! This week's Monday challenge is to create a layout about the reasons why you are so lucky. You might want to combine it with last week's ad challenge, since it already has convenient list journaling programmed right in. :) We had lots of takers for last week's stamping challenge! Way to go breaking out those stamps and using them! See what you can do with this week's challenge. Think about all the reasons that YOU are lucky.
~Catherine

3.16.2008

Challenges and Kits - Perfect Combination

The perfect combination for scrapbooking is a combo of challenges and new kits. I love a challenge. They motivated me last year to create 615 layouts for my family. This year, I've tried so hard to keep up with challenges. I am loving Deanna's March Oldies but Goodies Sketch challenge. http://www.scrapaddict.com/phpBB2/viewtopic.php?t=32033


I combined the new Damask me no Questions Kit http://www.scrapaddict.com/xcart/product.php?productid=28066&cat=299&page=1 and Deanna's Oldies Challenge to pull out my wedding photos from 1992! A long long time ago! This kit just seemed perfect.

The wonderful kit that Felicia and Company put together are so flexible. You can use them for a special set of pictures from last week or pictures taken in the last century. I look forward to new kits each month. I never know what they will call me to scrap. But you know what? They almost always help me to scrap at least one set of photos that I've been putting off.


My second layout from this kit was created using the sketch challenge for the week of March 10 featuring our vacationing Guest Designer Scrapnsmile's sketch. I stretched it to a 2 page spread for the remainder of my wedding photos.

I smile and put my scrapbooking supplies away... one kit - 2 two page spreads that have been waiting since 1992 to do. I have had a great weekend of scrapbooking thanks to the perfect combination of challenges and kits! YES!


Design Team Member and Co-Design Team Coordinator - www.scrapaddict.com

3.14.2008

Projetc kits


How often do you pick up project kits at the store or at your LSS? I was never one to even give these a second glance. Other than doing layouts, I'm not a huge fan of paper crafting projects. Just never had the knack for it. I did, however, come accross a cute Halloween kit in the clearance aisle at one of my local stores a few months ago. At $1.98, I couldn't resist but to give it a try.

All I had to do was supply my own pictures and a little glue. Everything else came in the kit. It was so surprisingly simple that I felt I cheated a little. It took me about half an hour to put it all together. (I can't even throw together a scrapbook page in that amount of time.) And, I honestly loved the results. Doing this kit was really fun, and I have since then come accross several other kits that I have purchased. Now that I'm getting the hang of these, I have been tempted to jazz them up a little and put my own spin on them. I'm a new fan of project kits!

3.12.2008

Scrapping Large Photos

Although I'm a multi-photo scrapper for the most part, occasionally I'll have one picture that can really stand on its own. Typically I'll enlarge that photo to a 5x7 and scrap that. Once in a while, for an especially favorite photo, I'll enlarge the photo to an 8x10 or an 8x12 size because this really gives the photo more impact. Scrapping a huge photo is tricky, though. You don't have much room to embellish and you don't want to overpower the photo, but you also want to be able to accent the photo and maybe include a little journaling.

**SNEAK PEEK ALERT**
In this first (landscape) example, the papers in this upcoming April kit were just perfect for this favorite photo. I was able to include my title in the "dead space" part of the photo. Notice the rule of threes with the placement of the embellishment, located in the upper right, lower left, and then lower right hand corners. I also layered my embellishments to add some interest to the lower right hand corner.


The next example is by Linda (2sweetgirls) and you can see how she adds some interest with the added curve in her portrait photo. Notice how she also used the rule of threes here with her accents in the upper right hand corner, then her title on her photo, and lastly, her journaling in the lower right hand corner. She has also done some layering of embellishments with the journaling tucked into the ribbon with the word accent and heart on top of that.


So, the next time you have a favorite photo, enlarge it to 8x10 or 8x12 try scrapping this size! :-)

3.10.2008

3/10 Monday Challenges!


Good Monday morning to everyone! It's supposed to be a sunshine-y day here headed for a spring-like 60 degrees. Certainly makes me want to open up my windows and let some fresh air in. I really love it when challenges are handed to me on a silver platter. On the SA message board last week there was some discussion about stamps....how we love to buy them and hoard them, but not use them a whole lot. So that's the Monday challenge for the week....to use a stamp you've never used before on a layout. I took the challenge myself this past weekend and did this layout. I used a Fancy Pants stamp on the bookplate, which was originally plain white. I thought it made the bookplate "match" up a little better with the BG papers.

On to our ad challenge. You can see the new ad here and also the layout I did with it.

Have fun with both of these challenges this week!
~Catherine

3.07.2008

JulieWorld Organizational Tips

[b]Yet Another Organizational Method from JulieWorld[/b]


There was a lot of chatter on the ScrapAddict boards this week regarding rubber/acrylic stamp and who knows, come Monday, there may be more yet to come. *major hint…and I mean MAJOR* I love stamps, especially acrylic ones, but found that they were definitely "out of sight, out of mind" scrapping items for me. After the purchase of my Clip It Up last fall I came up with what I think is a very brilliant *wink* storage idea that perhaps some of you might be able to use.

I purchased several sets of the Tim Holtz Unmounted Refill Pockets


made for his unmounted stamp case, both manufactured by Cropper Hopper. Each package contains five very sturdy top loading see-through "envelopes" which can easily be hung on my Clip It Up. The size is perfect for the approximate 5x7 dimensions of the Autumn Leaves stamp sets as well as those created by other manufacturers.


Since I keep my Clip It Up on my main scrap desk I just flip the unit to see all of my stamp sets at a glance.


This system has worked really well for me and I'm finding that I use my stamps so much more than I did with my previous storage method.


I discovered another method of storage for those smaller individual stamps that we all tend to collect. This 2nd storage solution involves the Cropper Hopper Zip N Flip envelope system. This product has clear top loading Ziploc envelopes that are staggered vertically onto a 3 holed punched backing and comes in two sizes. The medium size has 18 envies

while the larger size has 8 envies,


each size sold in sets of two. I packed several sets of these envies with my loose acrylic stamps and loaded them into a large 3 ring which I keep on a shelf. When I'm making cards I take the binder down and flip through my stamp collection. This system makes it very easy to see just what you have at a glance so no more "out of sight, out of mind."


JulieP

ScrapAddict Design Team Member

3.05.2008

Extending the life of your cards...

I love to make cards. The greatest thing is the instant gratification and thrill of completing something quickly that is handmade and sure to please. However, when I write in them, I feel like I ruin them. The joy is given to the person I sent it to and it is done. They enjoy them for a short while, it brightens their life and then might be put in a drawer and forgotten.

Recently I send the card unused. Unused?? You are asking??? I will write my note on a piece of white cardstock that fits inside the card. I also include a blank envelope (folded in half.) At the bottom of my note on the cardstock, I jot down a little bit for the receipient to spread the joy by share the card.

The first time I did that was last summer. Do you know that the person commented on that gift recently to me. I hope I helped her spread some joy to a person in her life that needs it.

Next time you send a card. Try it!

Jill
Design Team Member and Co-Design Team Coordinator - www.scrapaddict.com

3.03.2008

3/3 Monday Challenge


It's time for another Monday challenge and today we're going to take a new perspective on design. This week, I want you to create a layout that sits on a slant or diagonal. This one is a little difficult for me to do because I'm a pretty straight line kind of gal, but here's an example...a little hard to see the edges because it's sitting on white cardstock. So let's see you take a new slant on a layout this week.

3.01.2008

photo size...

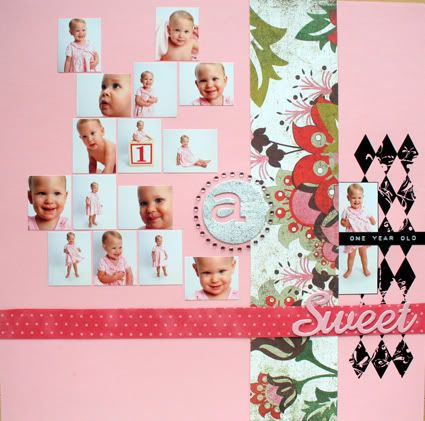
looking for a fun & easy way to change things up on your layouts? one perfect solution- vary the size of your photos. with small photos it gives room to maximize the amount of photos used, it lets you play with your creative space & it's a great way to use many photos of the "same subject" without having to create multiple layouts forcing yourself to narrow your photos down.
Photobucket
in this layout i printed all of the photos of my nieces one year photo shoot & printed them in 1 1/4" x 1 1/2" directly from my printer (HP D7360)...cut them all up & just randomly placed them on the layout...added a few strips of paper & a few embellishments & i instantly created a layout showcasing ALL of the photos instead of a whole album full. you can also do this with those cute little "contact sheets" many photo processors include when you get photos printed.

another way to change the mood is by using one LARGE photo. i do this ALL the time- it's one of my favorite layout boosters! many photo developers have caught on to us scrapbookers & they now offer the 8x12 size. LOVE IT! perfect way to make those layouts just pop right out of your albums & grab your loved ones attention!
Photobucket

can't wait to see what you all come up with....
Photobucket
Janelle

Preorder Heaven

In case you haven't noticed, there is preorder madness going on in the store. CHA had some amazing stuff, and we are bringing it to you online as fast as our fingers can get the product entered. Just for starters, we have K & Company, Maya Road, Prima Marketing, Scenic Route, and Basic Grey. When we say just for starters, we mean it, too. There are so many delicious goodies in the Preorder section, you can get lost in there! Check out just a few of the things up for sale right now:

Tim Holtz Grungeboard! This is one of the hottest new items this season and we have it right here in the preorder section.


How about Chatterbox Chipboard wings?

Don't forget the new Becky Fleck Pagemaps book, full of wonderful sketches for your scrapping inspiration.

If you aren't into waiting for preorders to hit the store, check out our "What's New" section, filled with the newest items to hit our store. These are the freshest in stock items we have. We just got in a brand new manufacturer called GCD Studios, bound to be a new favorite, and a lot of an old favorite, American Crafts.

Teresa Collins is flying off the shelf so fast we've already had to restock it, so get on over to the store and get 'em while they're hot!